The most important part of any engineering work is planning and make necessary drawings of that project on a proper scale. For those drawing, we need the engineering drawing sheets. There are various types of drawing sheets are available as per their size. Before selecting a drawing sheet, it is very important to know the relation between the Engineering Drawing sheets. These drawing sheet sizes are related to each other in various ways.
In this article, we will know the interrelation among the engineering drawing sheet formate as per ISO standards.
What are the different Engineering drawing sheet formates as per ISO?
ISO:216 recommends three series of drawing paper formates. These formates are ISO-A series, ISO-B series, and ISO-C series of drawings sheets. Each of these series includes many different paper sizes. For example, ISO-A series drawing sheets are termed as A0, A1, A2, and so on. Similarly, ISO-B and ISO-C series is termed as B1, B2, and C1, C2 respectively.
What is the full form of ISO?
ISO stands for International Organization for Standardization.
An ISO certification for any product indicates its compliance with international standards.
ISO-A Series as per ISO: 216
The ISO-A series of paper sizes are based on the constant ratio between the length and the width of that paper.
The length to width ratio of the ISO-A series of paper is √2:1. The largest size of the drawing sheet specified by ISO:216 is A0 size (1189 mm x841 mm ). In the table below you will find the dimensions of the most used ISO-A Papers sizes.
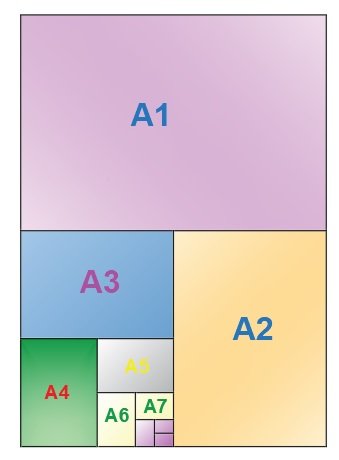
The relation between the Engineering Drawing sheets of ISO-A series:

Relation in terms of Dimensions-
Two cases arise while establishing the relation in terms of sizes.
Case 1: When the dimension of the longer side of the previous drawing sheet is an odd number
For example- Relation between A0 and A1 paper
(A0→A1) – The larger side (Length) of the A0 sheet is 1189 mm, so the shorter side of the A1 becomes (1189-1)/2 =594mm.
The shorter side ( width) of the A0 sheet directly becomes the longer side of the A1 sheet.
A0= 1189 x 841 mm
A1 =841 x 594 mm
This is also applied when we in the case of (A1→A2), (A4→A5), (A7→A8), (A10→A11).
Case 2: When the dimension of the longer side of the previous drawing sheet is an even number
For example- Relation between A2 and A3 paper
(A2→A3) – The larger side of the A2 sheet is 594 mm, then the shorter side of the A3 becomes 594/2 =297 mm.
The shorter side of the A2 sheet directly becomes the longer side of the A3 sheet.
A2 = 420 x 594 mm
A3= 297 x 420 mm
This is also applied when we in the case of (A3→A4), (A5→A6), (A6→A7), (A8→A9), (A9→A10), (A11→A12).
In terms of Area
The area of an A0 drawing sheet is 1 m². As the A1 drawing sheet is half of the A0 sheet in terms of area, the area of A1 is 0.5 m². Similarly, the area of the A2 engineering drawing sheet is 0.25 m², which is half of the A1 dawing sheet area.
The previous Engineering drawing sheet is twice the current drawing sheet in the area.
ISO-B Series as per ISO: 216
ISO-B series of drawing sheets fulfill the size needs between various sizes ISO-A series.
For example, if you need any drawing sheet which is smaller than A0 but larger than A1, then the B1 sheet of the ISO-B series is used.
The relation between the Engineering Drawing sheets of ISO-A and ISO -B series:
Basically, ISO-B sizes are the geometrical mean between the ISO-A sheet of the same number and its previous number.
Example: B1 size is the geometrical mean of A0 and A1 sizes.
The relation between the Engineering Drawing sheets of ISO-B series:
In terms of Dimensions
The relation between the dimensions of the engineering drawing sheets of ISO -B series are as follows:
- B0→B1 – The dimension of B0 is 1000 x 1414 mm. The longer side (1414mm) is an even number. Hence the shorter side of B1 is exactly half of the longer side of B0. The shorter side of the B0 (1000 mm) becomes the longer side of B1. Thus the dimension of B1 is (707 x 1000) mm.
- B2→B3 – The size of the B2 sheet is 500 x 707 mm. The longer side (707 mm) is an odd number. So the shorter side of B3 is (707-1)/2 = 353 mm. The shorter side of the B2 (1000 mm) becomes the longer side of B3. Thus the dimension of B3 is (353 x 500) mm.
In terms of Area
The area of any engineering drawing sheet is half of the previous drawing sheet within the ISO-B series.
For example-
The area of B0 is 1000x 1414 mm = 1.414 m².
The area of B1 is 707 x 1000 mm= 0.707 m² ( half of B0 ).
Similarly, the area of B2 is 0.3535 m² (half of B1 ).
ISO-C Series as per ISO: 216
ISO-C series is called as the envelope series. These sizes are used for making envelopes within which an ISO-A series page will fit comfortably.
Example: An A2 page will fit comfortably within an envelope of C2 size.
The relation between the Engineering Drawing sheets of ISO-A ,B, C series:
Basically, ISO-C sizes are the geometrical mean between the ISO-A sheet of the same number and ISO-B sheet of the same number.
Example: C1 size is the geometrical mean of A1 and B1 sizes.
The relation between the Engineering Drawing sheets of ISO-C series:
In terms of Dimensions
The relationship (dimensions) between two consecutive drawing sheets of the ISO – C series can be established in the same way as ISO-A and B series.
In terms of Areas
For a set of two consecutive drawing sheets of the ISO – C series, the area of the previous drawing sheet is twice the current drawing sheet.
What are the dimensions of a standard Legal size paper?
The dimension of standard legal paper in Millimeters is 216 x 356 mm
What are the dimensions of a standard letter size paper?
The dimension of standard letter size paper in Millimeters is 216 x 279 mm
What are the dimensions of standard Executive size paper?
The dimension of standard executive size paper in Millimeters is – 191 x 254 mm.

